Last summer, Grafana Labs introduced Grafana onCall, a new opensource tool which aims to provide a unified interface to manage oncall rotations and alert routing. The tool was designed with the needs of engineers and developers in mind and is able to receive alerts from many different types of monitoring systems (Alertmanager, Zabbix, Grafana Alerting or just about anything using webhooks).

The general idea of collecting alerts in a centralized application and route them based on rules and schedules is a well-established practice. Numerous tools, both commercially available and open-source, offer similar capabilities. A big advantage of Grafana onCall over all the other tools is the seamless integration in the Grafana UI. Many companies and teams already maintain operational Grafana instances and use them to create dashboards or use the Grafana Explorer to gain a better understanding about their metrics, logs and traces. Being able to configure oncall schedules and alert routing in the same familiar interface simplifies these tasks.
Before we explore the main features of Grafana onCall let’s take a look at what it takes to deploy onCall. Grafana onCall consists of two primary components: a Grafana plugin, responsible for integrating onCall seamlessly within the Grafana interface and the engine that operates as a standalone container or application, offering the core functionality through the onCall API. The onCall engine relies on some dependencies such as celery, redis, RabbitMQ and a database (MariaDB, Postgres or SQLite). To streamline the deployment process of onCall, Grafana provides a Helmchart which bundles all the dependencies mentioned above. For non-production environments or demonstration purposes, it’s also possible to start onCall using docker-compose. Once the engine is up and running and the onCall plugin has been installed in Grafana, the next step is to configure the onCall API url in the settings of the onCall plugin within the Grafana UI.
Integrations
Integrations are the main entry point, where your alerts are being consumed by Grafana onCall. They allow you to receive alerts via a unique API URL, group and interpret them using templates. OnCalls list of available integrations ranges from Grafana Alerting, Alertmanager, Jira, Zabbix to things like Inbound Emails or Inbound Webhooks to just mention a few. Before we talk about the setup of the integration for the Prometheus Alertmanager lets quickly explain how alerts flow within an integration.
Generally, an alert is received on an integration’s unique URL as an HTTP POST request with a JSON payload. The routing of the alert is determined by applying a routing template, which is used to route alerts to different escalation chains based on alert content. You can use alert templates to format and tailor your alert’s content before it gets routed.
Now let’s see how we can actually configure an integration for Alertmanager. First, you need to click „New Integration“ on the integrations page, where you can directly select the Prometheus Alertmanager. After you named and described your integration you will get the following:
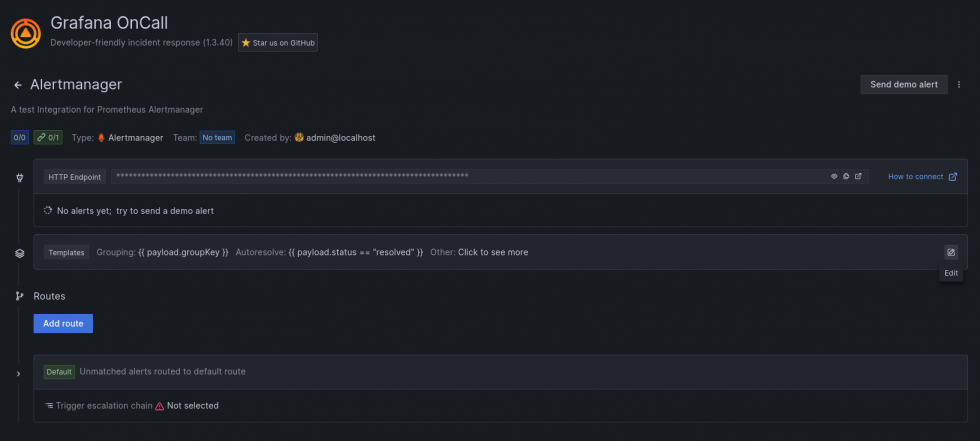
We currently don’t have any routes nor do alerts get to Oncall. This is because we will need to configure a Webhook receiver in the Prometheus Alertmanger. As mentioned we can now see the unique URL for the HTTP endpoint. An example could be: https://oncall-api.example.com/integrations/v1/alertmanager/NcU1cf4a2ngh76HEkBup8CCUJ/.
So in your alertmanager config you could add the following so all alerts with a label team=ops or team=engineering would get routed to OnCall. In addition, the continue: true is very helpful if you want to use the matchers for additional receivers alongside OnCall.
route:
  receiver: "oncall"
  group_by: [alertname, email, team]
  routes:
  - continue: true
    matchers:
    - team =~ "ops|engineering"
    receiver: oncall

receivers:
  - name: "oncall"
    webhook_configs:
      - url: https://oncall-api.example.com/integrations/v1/alertmanager/NcU1cf4a2ngh76HEkBup8CCUJ/
        send_resolved: true
        max_alerts: 100
Back in OnCall and our integration, let’s assume the two teams have different escalation chains as well as notification channels. We can use OnCalls routing templates to set up individual alert routes per team. Here is an example:
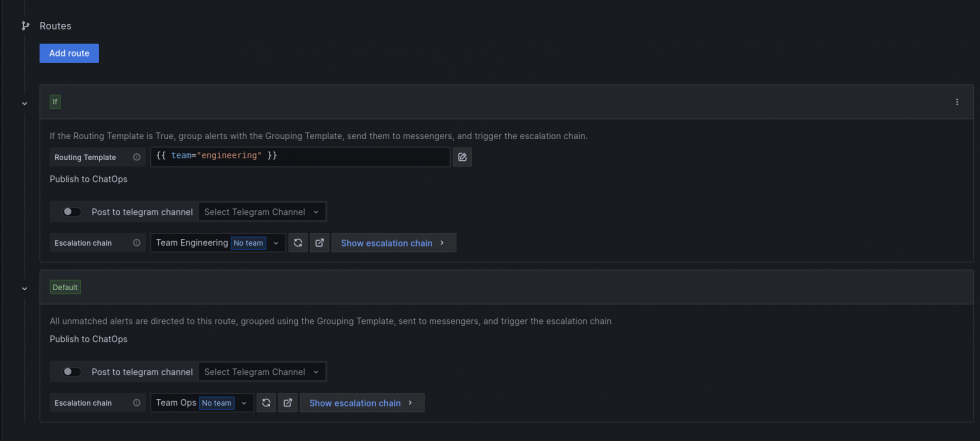
In the example above, the team engineering will receive alerts to their escalation chain (based on the label team). Everything else would get routed to the Ops Teams escalation chain.
Once that we have our alerts grouped and assigned to routes with escalation chains, the escalation chains will be executed.
Escalation chains
Escalation chains determine who and when to notify. Users can set how they get notified based on their own preferences. Once an alert is routed to an escalation chain, the escalation chain will continue to execute, until a user performs an action to stop the chain. Examples could be: acknowledging, resolving or silencing of alerts. Based on different kind of escalation steps, users can configure workflows that serve their needs and allow a multitude of notifications. For example, you could notify on-call users in a round-robin manner, trigger an outgoing webhook or just send a notification into a Slack channel.
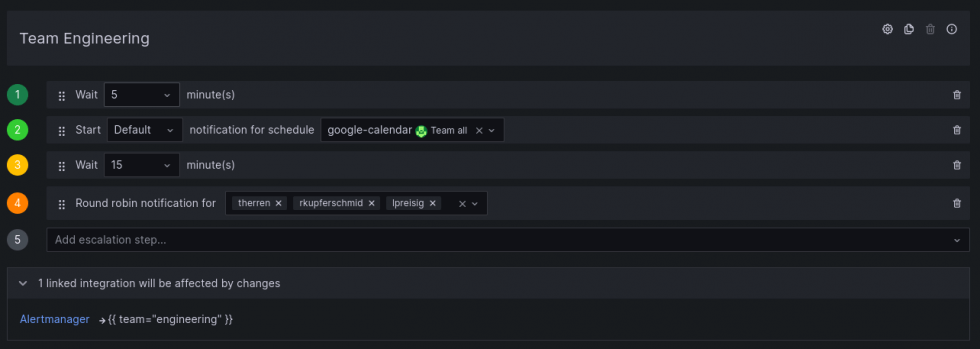
The following shows an example escalation chain for an engineering team which will be triggered if an alert has the label team="engineering". The chain would first wait for 5 minutes, before notifying users in a planned schedule (see below), wait another 15 minutes and if at this point no one has performed an action with the alert, finally 3 users would get notifications in a round-robin manner.
Schedules
Another great feature of Grafana onCall is the ability to create oncall schedules based on an existing calendar. All you need is an iCal url that is accessible by Grafana. To create a schedule, go to the schedule menu, click on „New schedule“ and select „Import schedule from iCal Url“. Grafana onCall will then query the calendar url at regular intervals and use the information in the calendar to update the oncall schedule. Each event in the calendar creates one on-call shift within Grafana onCall. In order for onCall to associate the event with a user, the title of the calendar event has to match the Grafana username. In the following example, we have three users with sequential shifts:
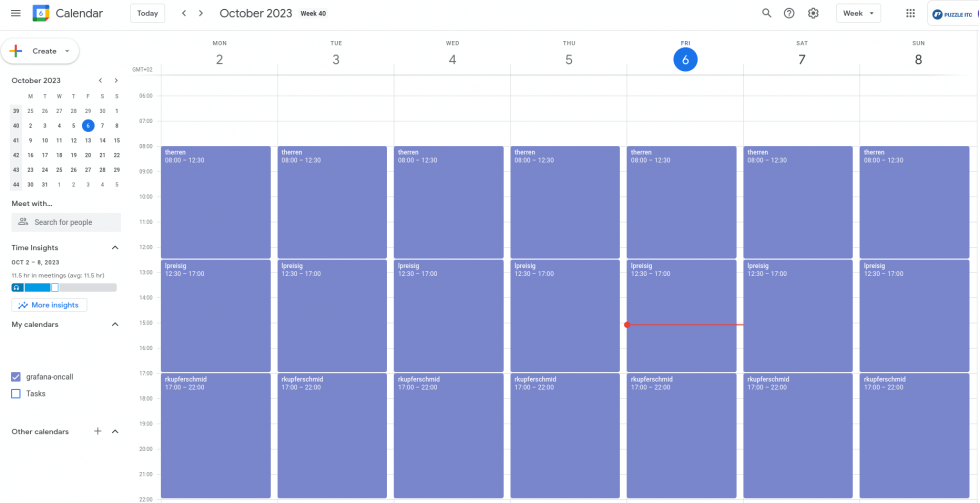
The resulting onCall schedule looks as follows:
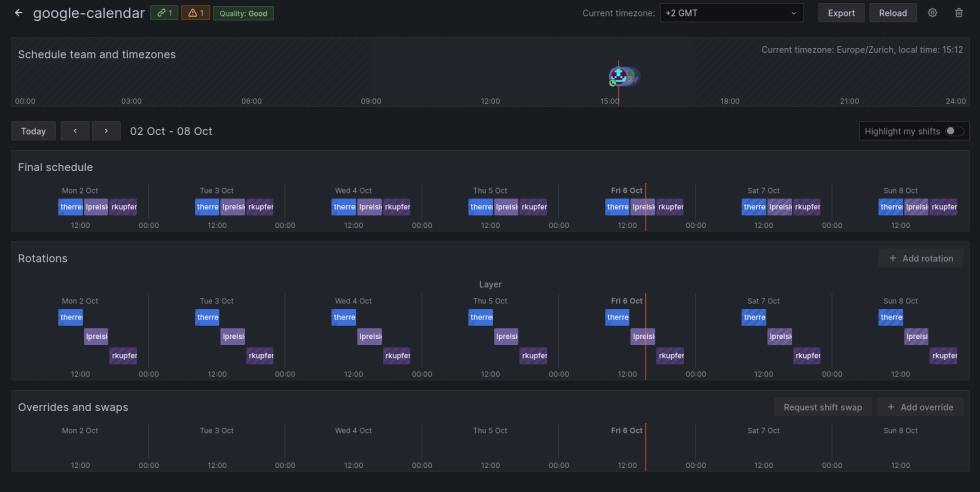
Calendar events can have a range of priorities indicated by a title prefix (e.g. [L1]). The priority levels range from [L0] to [L9], with events having higher numbers taking precedence over those with lower numbers. If an event does not specify a priority, it will be automatically assigned the default priority of [L0]. Additionally, it is possible to create multiple overlapping events of the same priority, which will lead to notifications being dispatched to all overlapping users.
Using these priority levels, we can easily override certain shifts within our oncall schedule. In the following example, we will override parts of a shift by creating a second overlapping calendar event with a higher priority ([L1] in this case). On the left-hand side, you will find the calendar override event, and on the right-hand side, you can observe the resulting on-call schedule within Grafana onCall.
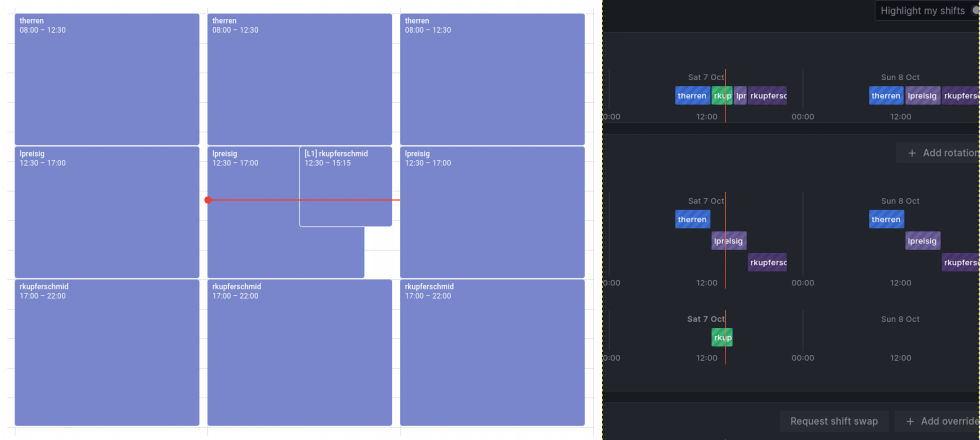
As an alternative, it is also possible to request a shift swap directly in Grafan onCall by clicking the „Request shift swap“ button on one of your future shifts. Note however, that these changes will only be visible in Grafana onCall and will not be synchronized back to your calendar.
ChatOps
With our integrations, escalation chains and schedules setup, we can finally proceed to the last step of the configuration: setup Grafana onCall so send the alerts to our favorite chatops tool. In the opensource version of OnCall we can configure either Slack or Telegram, whereas the Grafana Cloud offering also allows configuring Microsoft Teams. Since we do not use Slack at Puzzle, we decided to try the Telegram integration. The configuration is pretty straight forward and described at the Grafana onCall documentation. Whether or not a user will receive alerts on Telegram is up to the user. In user profile a user can configure their favorite notification method and choose either phone, slack, telegram or the Grafana mobile app:
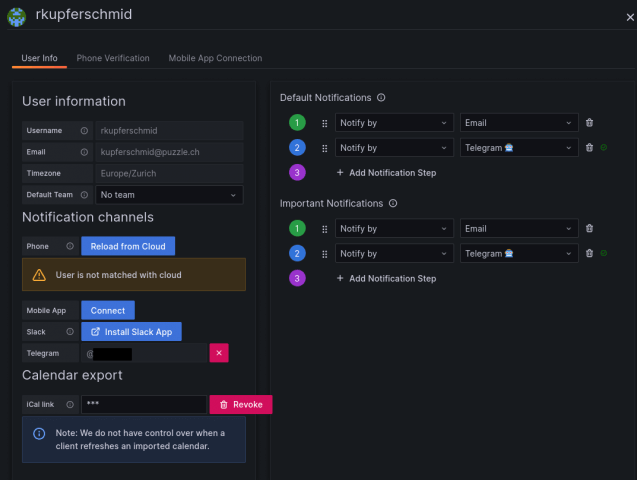
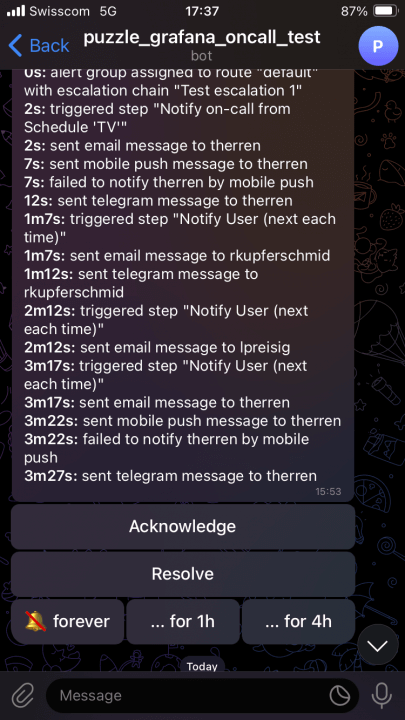
The beauty of the Grafana onCall chatops integrations is that you can acknowledge, resolve or silence an alert directly from within your chat tool:
onCall App
Grafana offers an optional onCall mobile app that can be used to receive alerts from your Grafana onCall instance. However, this feature comes with a limitation: onCall leverages the Grafana Cloud to push notifications to the mobile app users. Consequentially, you need to have a Grafana Cloud instance to use the mobile app. In order for a user to receive alerts on the mobile app, the user has to exist in both your local onCall instance and the Grafana Cloud instance. The matching of the users is performed via the users email address. As of today, the free tier of Grafana Cloud is limited to three monthly active IRM users. If your team or company consist of more than three people and all of them would like to use the onCall mobile app, you are therefore required to obtain a paid Grafana Cloud instance.
Conclusion
When we first started exploring onCall, we were quite overwhelmed with all the features and the terminology. But once we understood how alert groups, integrations, escalation chains and schedules work together, we were able to build quite complex alert routing chains within just a few minutes. The chatops integration is a powerful feature that is especially useful in larger teams. In our opinion, there are still a few quirks here and there. One example is the user sync: at first, the users in Grafana do not appear in the onCall users overview. As we found out, there is a regular sync job that synchronizes the users from Grafana to the onCall backend.
It’s also important to note, that when used in production, Grafana onCall is one of the most important parts within your alerting chain. The monitoring of Grafana onCall and all its components is therefore absolutely necessary.


